What are Custom TV Template Variables?
MODX Revolution allows you to create your own custom TV input types (similar to already available types like textbox, radio, textarea, richtext, etc.) for your TVs. This tutorial will show a very simple example by loading a simple template dropdown for us in the Manager, and then on the frontend displaying our template ID wrapped in a special <div> block. Let’s call it TemplateSelect. We’ll also create an Add-on called OurTVs, which means we’ll have the files outside of the normal input TV render directory and we’ll put them in our own Add-on directory at core/components/ourtvs/.
Create a Namespace
If you haven’t already, create a namespace called ourtvs with the path {core\_path}components/ourtvs/. This will help us later.
Create a Plugin
We’ll need a plugin to tell MODX where our custom TV directories are. Make a plugin called OurTvsPlugin and attach it to the following events:
- OnTVInputRenderList – to display the actual input TV in the backend
- OnTVOutputRenderList – to display the TV output in the frontend
- OnTVInputPropertiesList – to load any custom properties for the input renderer in the Manager
- OnTVOutputRenderPropertiesList – to load any custom properties for the output TV renderer (frontend)
- OnDocFormPrerender – to load any custom JS/CSS for our TV
Now enter the plugin code:
$corePath = $modx->getOption('core_path',null,MODX_CORE_PATH).'components/ourtvs/';
switch ($modx->event->name) {
 case 'OnTVInputRenderList':
 $modx->event->output($corePath.'tv/input/');
 break;
 case 'OnTVOutputRenderList':
 $modx->event->output($corePath.'tv/output/');
 break;
 case 'OnTVInputPropertiesList':
 $modx->event->output($corePath.'tv/inputoptions/');
 break;
 case 'OnTVOutputRenderPropertiesList':
$modx->event->output($corePath.'tv/properties/');
break;
case 'OnManagerPageBeforeRender':
break;
}
These event handlers tell MODX to check these directories for our TV files when doing all of its rendering and processing. Think of it like adding a library or including paths.
You won’t need a plugin to define the path in MODX 3. The namespace will handle all of the paths. That’s why we told you to create a namespace earlier. 🙂
Creating an Input Controller
The input controller is what actually loads the markup for the custom TV input. Create an input controller file here:
core/components/ourtvs/tv/input/templateselect.class.php
Place the following code inside:
<?php
if(!class_exists('TemplateSelectInputRender')) {
class TemplateSelectInputRender extends modTemplateVarInputRender {
public function getTemplate() {
return $this->modx->getOption('core_path').'components/ourtvs/tv/input/tpl/templateselect.tpl';
}
public function process($value,array $params = array()) {
}
}
}
return 'TemplateSelectInputRender';
Here we tell it where to find our smarty template for rendering the TV, and also that there is a process() method to perform any business logic we want to perform before rendering the TV.
Now you can see that here we specify the tpl file to render our TV. Let’s go ahead and add this in:
core/components/ourtvs/tv/input/tpl/templateselect.tpl
And add the content:
<select id="tv{$tv->id}" name="tv{$tv->id}" class="combobox"></select>
<script type="text/javascript">
// <![CDATA[
{literal}
MODx.load({
{/literal}
 xtype: 'modx-combo-template'
 ,name: 'tv{$tv->id}'
 ,hiddenName: 'tv{$tv->id}'
 ,transform: 'tv{$tv->id}'
 ,id: 'tv{$tv->id}'
 ,width: 300
 ,value: '{$tv->value}'
{literal}
 ,listeners: { 'select': { fn:MODx.fireResourceFormChange, scope:this}}
});
{/literal}
// ]]>
</script>
You don’t have to use ExtJS code like shown here to have a custom input type. It can even be a simple HTML input. It’s really up to you. The most important thing is that your input type has a name tv{$tv->id}.
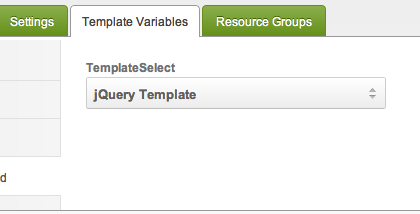
And that should give us a nice template dropdown in the backend:
Creating an Output Controller
So now we want to create an output controller, let’s create a file at:
core/components/ourtvs/tv/output/templateselect.class.php
And now the content:
if(!class_exists('TemplateSelectOutputRender')) {
class TemplateSelectOutputRender extends modTemplateVarOutputRender {
public function process($value,array $params = array()) {
return '<div class="template">'.$value.'</div>';
}
}
}
return 'TemplateSelectOutputRender';
So now that we We render this in the frontend, it will display the id of our chosen template enclosed in a div.